

I’m in Fort Myers, Florida for spring break vacation right now, and the great weather has given me a great chance to see and photograph animals outdoors.
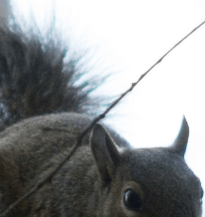
I took a picture of this squirrel this past week.

Do you see the ugly neon purple/pink color that surrounds the branches? Do you see the un-natural neon green as well? This is an example of chromatic aberration.
Chromatic aberration is an optics issue that occurs because different colors of light travel at different speeds when passing through a lens. The result can be manifested in color fringing– colored edges within the image. (Source: Photography Life).
This is something you can fix quite easily in Lightroom, using its Defringing tool.
NOTE: I’d love for you to use this image to follow along this color adjustment tutorial, so here’s the RAW file for this squirrel photograph: https://www.dropbox.com/s/imhw9m87hi98q23/Squirrel_Color_Fringing_Template_Matt_Lau.ARW?dl=0
Here’s the image before after making Lightroom color corrections to remove chromatic aberration/color fringing.
Step 0: Crop the Image.
Step 1: Find the Lens Correction Tab on the right hand side toolbar in Lightroom.
Step 2: Select the Color section.
Step 3: Click on the “Fringe Color Selector” (the dropper icon).

Step 4: Hover over the image.
With the dropper now “equipped,” you’ll see this palette of colors when you hover your mouse over the image.

Your selection will be the center square of the palette grid. Once you click on a spot, Lightroom will do its magic and remove purple fringing from your image.
Step 5: Click on a spot in the image where there is purple fringing.
Note: If you click on a color that Lightroom doesn’t recognize as purple/magenta or green/blue, the program will give you a nice error message and you can easily try again).
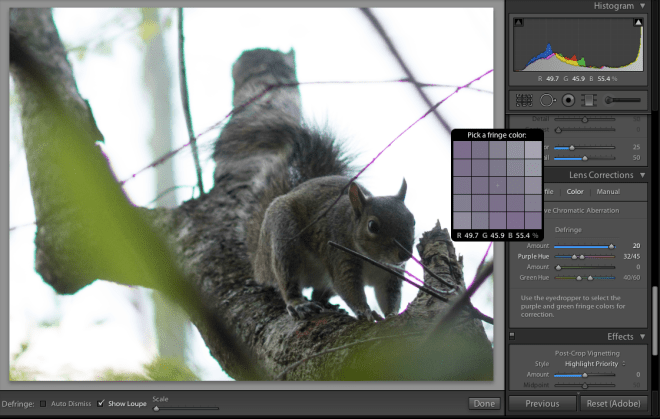
Lightroom’s magic will immediately remove some of that harsh neon purplish-pink-ish color. But not always enough, as the case here. There is still very terrible fringing in man parts of the image. One that particularly “sticks” out is the branch right above the squirrel’s right ear (viewer’s left-side). Pun intended 🙂
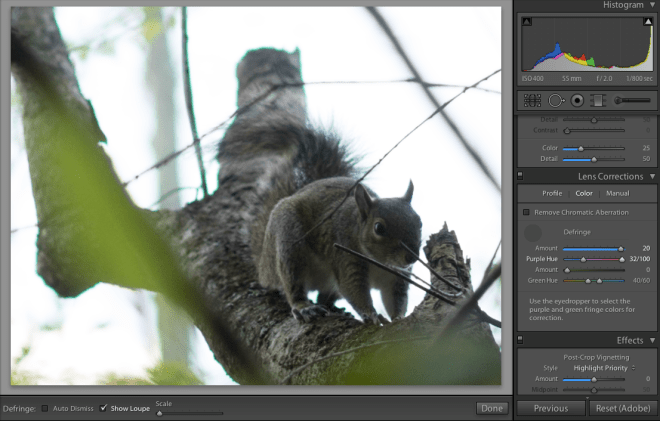
Step 6: Make manual adjustments.
Here’s when we want to manually mess around with the settings in the Color section of the Lens Corrections Tab.
Focus only on the first “Amount” horizontal bar and “Purple Hue” bar below it (these have to do with purple fringing. The two bars below are for green fringing).
Here are the settings I had for the squirrel image before after I manually adjusted the fringing:


Lightroom had used the color I had selected with the color picker and chosen to drastically defringe the image (Amount: 20) over a small Purple Hue range (32/45). After messing around with the settings myself,, I extended the Purple Hue range to 32/100, which removed a good amount of the purplish/pink that was still present in the image.
Here’s a look at our progression so far. No color adjustments -> Lightroom Auto-Adjustment –> Manual Setting Adjustment


Important Note: be EXTREMELY careful when performing color corrections on Lightroom. Always check the entire image and see if the color has affected anything else incorrectly. Sometimes when removing purple fringing too much, it will start to remove pink/red/purple color from the image (for example: purple clothing, dark red lipstick, etc.).
Step 7: Remove green fringing, using similar steps as before.
Alright. On to the green fringing. I’ll be less detailed- let you figure more of it out on your own!
Choosing the color selector again, I hovered over patch of cyan color on the twig to the upper left hand side of the squirrel’s tail, then clicked on the most neon grid.

Lightroom did a great job here. But there’s still a little cyan hiding around somewhere.
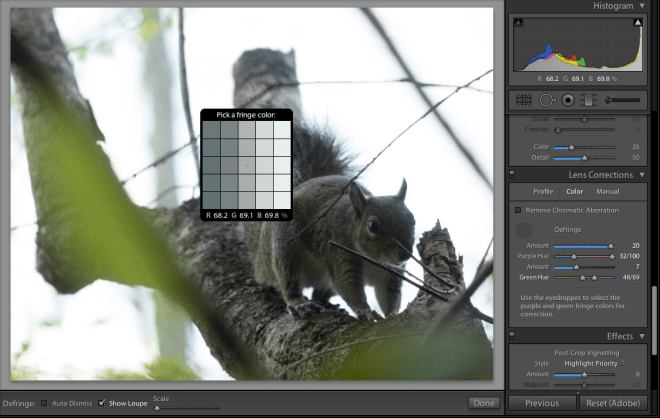
Can you find it?
There’s a little bit in the fur of the tail, as well as the border of the squirrel’s left ear (your right side).
I would then adjust the Green Hue range to account for more blue (48/69 -> 48/100).


As you can see below, a good amount blue in the tail has disappeared.


Color corrections complete!
Step 8: Make image more sharper and/or more appealing.
Lastly I’m going to use the adjust the sharpness of the image and some basic light settings to make the image more vivid and appealing.
 Sharpening: (+) Sharpness – 77, (+) Radius – 1.5
Noise Reduction: (+) Luminance – 11, (-) Detail (under Luminance) – 7, (-) Detail (under Color) – 3
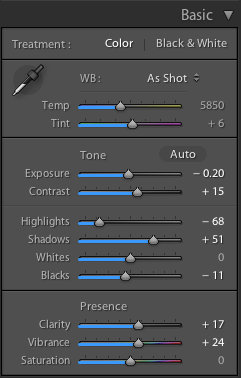
Then I just adjusted a few Basic light settings.
And alas, the final image.

Challenge #LR1: Try making color corrections on Lightroom to remove chromatic aberration. Feel free to use my image, or perhaps your own (which leads to Challenge #LR2)!
Challenge #LR2: Find a photograph of your own that you have taken in the past that has chromatic aberration in it, or take a new one! I’ve found that it occurs very often when a subject is in front of an overexposed (or very bright) sunlit background (for example, the squirrel’s background is the sun-lit sky).
Please comment with any questions you may have, or if there is any part of this tutorial that is unclear or difficult to understand. I would also love to the see any results you may have achieved while trying the challenges listed above. Until next time!
